使用 ffmpeg 和 Nginx 转发海康摄像头视频流
背景说明
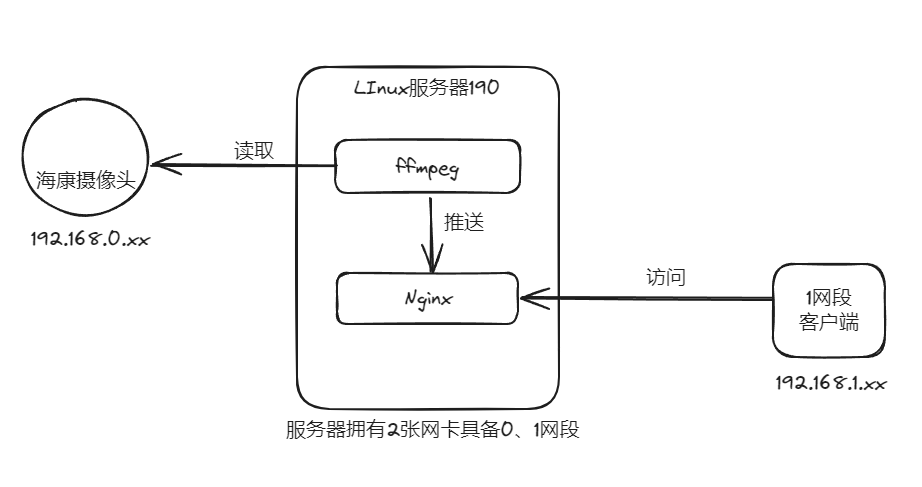
摄像头网络与服务器网络在 2 个网段,摄像头网络在 0 网段局域网没有外网,服务器网络在 1 网段可以连接外网同时可以访问 0 网段。
现需要在其他 1 网段客户端得到这个视频流
服务器环境 CentOS Linux
安装 Nginx 和 nginx-http-flv-module
安装环境依赖(192.168.1.190)
yum install gcc gcc-c++ autoconf automake -y
yum install zlib zlib-devel -y
yum install pcre pcre-devel -y
yum install openssl openssl-devel -y
yum install patch -y
yum install git -y
进入 src 目录
#进入src目录
cd /usr/local/src
下载 Nginx
这里我又安装了一个正向代理的 module,不用的可以去掉
#下载nginx源码包
wget http://nginx.org/download/nginx-1.18.0.tar.gz
#解压nginx源码包
tar zxvf nginx-1.18.0.tar.gz
下载正向代理第三方模块(这个不用,是我做其他事情的插件)
#克隆第三方模块项目到本地
git clone https://github.com/chobits/ngx_http_proxy_connect_module.git

#进入解压后的nginx目录
cd nginx-1.18.0
#根据官方文档对第三方模块进行处理(patch一定要在 nginx 解压目录里面执行)配置 正向代理模块
patch -p1 < /usr/local/src/ngx_http_proxy_connect_module/patch/proxy_connect_rewrite_101504.patch
下载 nginx-http-flv-module 第三方模块

官方文档有点坑没说咋下载,一笔带过,哭死。
Github 官方文档
网上好多 git 的地址不好用
git clone https://github.com/winshining/nginx-http-flv-module.git使用 wget 好用
#下载nginx-http-flv-module
wget https://github.com/winshining/nginx-http-flv-module/archive/master.zip
#解压 nginx-http-flv-module
unzip master.zip

#一般将这个放在usr/local,目录下。这里放在了 usr/local/src 下了
配置 Nginx
#配置nginx参数,注意module要切换成上面下载的module地址
./configure --prefix=/usr/share/nginx --sbin-path=/usr/sbin/nginx --modules-path=/usr/lib64/nginx/modules --conf-path=/etc/nginx/nginx.conf --error-log-path=/var/log/nginx/error.log --http-log-path=/var/log/nginx/access.log --http-client-body-temp-path=/var/lib/nginx/tmp/client_body --with-http_stub_status_module --http-proxy-temp-path=/var/lib/nginx/tmp/proxy --http-fastcgi-temp-path=/var/lib/nginx/tmp/fastcgi --http-uwsgi-temp-path=/var/lib/nginx/tmp/uwsgi --http-scgi-temp-path=/var/lib/nginx/tmp/scgi --pid-path=/run/nginx.pid --lock-path=/run/lock/subsys/nginx --user=nginx --group=nginx --with-file-aio --with-http_ssl_module --with-http_v2_module --with-http_realip_module --with-stream_ssl_preread_module --with-http_addition_module --with-http_gunzip_module --with-http_gzip_static_module   --with-stream_ssl_module  --add-module=/usr/local/src/ngx_http_proxy_connect_module
#编译
make
#编译后的安装
make  install
验证插件是否安装
#查看是否已经添加了rtmp模块
nginx -V

#出现configure arguments: --add-module=../nginx-http-flv-module-master
#说明已经添加了rtmp模块
修改配置文件
配置文件位置:/etc/nginx/nginx.conf
#user  nobody;
worker_processes  1;

#error_log  logs/error.log;
#error_log  logs/error.log  notice;
#error_log  logs/error.log  info;

#pid        logs/nginx.pid;


events {
    worker_connections  1024;
}


http {
    include       mime.types;
    default_type  application/octet-stream;

    #log_format  main  '$remote_addr - $remote_user [$time_local] "$request" '
    #                  '$status $body_bytes_sent "$http_referer" '
    #                  '"$http_user_agent" "$http_x_forwarded_for"';

    #access_log  logs/access.log  main;

    sendfile        on;
    #tcp_nopush     on;

    #keepalive_timeout  0;
    keepalive_timeout  65;

    #gzip  on;

    server {
        listen       80;
        server_name  localhost;

        #charset koi8-r;

        #access_log  logs/host.access.log  main;

        location / {
            root   html;
            index  index.html index.htm;
        }

        #error_page  404              /404.html;

        # redirect server error pages to the static page /50x.html
        #
        error_page   500 502 503 504  /50x.html;
        location = /50x.html {
            root   html;
        }
    }

	# 正向代理的2个server配置
	server {
    		resolver 114.114.114.114;
    		listen 3128;
    		location / {
        		proxy_pass http://$http_host$request_uri;
        		proxy_set_header HOST $http_host;
        		proxy_buffers 256 4k;
        		proxy_max_temp_file_size 0k;
        		proxy_connect_timeout 30;
        		proxy_send_timeout 60;
        		proxy_read_timeout 60;
        		proxy_next_upstream error timeout invalid_header http_502;
    		}
	}
	server {
     		listen                         8443;
     		resolver                       114.114.114.114;
     		proxy_connect;
     		proxy_connect_allow            443 563;
     		proxy_connect_connect_timeout  10s;
     		proxy_connect_read_timeout     10s;
     		proxy_connect_send_timeout     10s;

     		location / {
         		proxy_pass http://$host;
         		proxy_set_header Host $host;
     		}
	}

	# 视频流代理
	server {
		# 监听的接口使用8991,自定义
        listen       8991;

        location /live {
            flv_live on; #打开 HTTP 播放 FLV 直播流功能
            chunked_transfer_encoding on; #支持 'Transfer-Encoding: chunked' 方式回复

           	add_header 'Access-Control-Allow-Origin' '*'; #添加额外的 HTTP 头
            add_header 'Access-Control-Allow-Credentials' 'true'; #添加额外的 HTTP 头
        }
    }
}

rtmp_auto_push on;
rtmp_auto_push_reconnect 1s;
rtmp_socket_dir /tmp;

rtmp {
    out_queue           4096;
    out_cork            8;
    max_streams         128;
    timeout             15s;
    drop_idle_publisher 15s;

    log_interval 5s; #log 模块在 access.log 中记录日志的间隔时间,对调试非常有用
    log_size     1m; #log 模块用来记录日志的缓冲区大小

    server {
        listen 1935;
        server_name www.test.*; #用于虚拟主机名后缀通配

        application myapp {
            live on;
            gop_cache on; #打开 GOP 缓存,减少首屏等待时间
        }

        application hls {
            live on;
            hls on;
            hls_path /tmp/hls;
        }

        application dash {
            live on;
            dash on;
            dash_path /tmp/dash;
        }
    }

    server {
        listen 1935;
        server_name *.test.com; #用于虚拟主机名前缀通配

        application myapp {
            live on;
            gop_cache on; #打开 GOP 缓存,减少首屏等待时间
        }
    }

    server {
        listen 1935;
        server_name www.test.com; #用于虚拟主机名完全匹配

        application myapp {
            live on;
            gop_cache on; #打开 GOP 缓存,减少首屏等待时间
        }
    }
}
创建 nginx 用户和组
groupadd -r nginx
useradd -r -g nginx -d /var/cache/nginx -s /sbin/nologin nginx
chown -R nginx:nginx /usr/local/src/nginx-1.18.0

# 创建启动环境
mkdir -p /var/lib/nginx/tmp/client_body/var/lib/nginx/tmp/client_body
启动 Nginx
#测试配置文件是否正确,不正确去看日志
nginx -t
#启动
nginx
#停止
nginx -s stop
#重载配置文件
nginx -s reload
# 查看是否启动
ps -aux | grep nginx
Nginx 开机自启脚本
1 先创建开机自启脚本
cd /etc/systemd/system

vim nginx.service
脚本内容:
[Unit]
Description=The Nginx HTTP and reverse proxy server
After=network.target

[Service]
Type=forking
PIDFile=/run/nginx.pid
ExecStartPre=/usr/sbin/nginx -t
ExecStart=/usr/sbin/nginx
ExecReload=/bin/kill -s HUP $MAINPID
ExecStop=/bin/kill -s QUIT $MAINPID
PrivateTmp=true

[Install]
WantedBy=multi-user.target
2 设置文件权限
cd /etc/systemd/system
chmod 755 nginx.service
3 设置开机自启动
systemctl daemon-reload
systemctl enable nginx
4 验证
# 之前启动过使用 nginx -s stop 停止再执行下面命令
# nginx启动
systemctl start nginx
# nginx停止
systemctl stop nginx
5 常用命令
#启动nginx服务
systemctl start nginx.service

# 重新启动nginx服务
systemctl restart nginx.service

# 查看nginx服务当前状态
systemctl status nginx.service

# 停止开机自启动
systemctl disable nginx.service
验证插件是否生效
正向代理,通过查看 listen 端口是否启动
netstat -nutpl
Proto Recv-Q Send-Q Local Address           Foreign Address         State       PID/Program name
tcp        0      0 0.0.0.0:3128            0.0.0.0:*               LISTEN      7443/nginx: master
tcp        0      0 0.0.0.0:80              0.0.0.0:*               LISTEN      7443/nginx: master
tcp 0 0 0.0.0.0:8443 0.0.0.0:* LISTEN 7443/nginx: masternginx-http-flv-module
hint:可以通过 linux 查看端口占用情况
lsof -i:1935如果 1935 端口开启,会有类似如下的信息:
[root@k8s-node1 nginx]# lsof -i:1935
COMMAND  PID USER   FD   TYPE    DEVICE SIZE/OFF NODE NAME
nginx   3387 root    7u  IPv4 247733434      0t0  TCP *:macromedia-fcs (LISTEN)
nginx   3388  www    7u  IPv4 247733434      0t0  TCP *:macromedia-fcs (LISTEN)
ffmpeg 安装
安装 yasm
yum install yasm安装 ffmpeg
cd /usr/local/src
wget http://www.ffmpeg.org/releases/ffmpeg-4.1.tar.gz
tar -zxvf ffmpeg-4.1.tar.gz
cd ffmpeg-4.1/
./configure --prefix=/usr/local/ffmpeg
# 这一步很慢,大概5-10分钟,耐心等待
make && make install

# 去试试
cd /usr/local/ffmpeg/bin/
./ffmpeg -version

# 查看当前bin路径,给环境变量路径使用
pwd
vim /etc/profile
# 在最后PATH添加环境变量
export PATH=$PATH:/usr/local/ffmpeg/bin
# 保存退出 更新
source /etc/profile

# 找一个其他文件测试 ffmpeg 环境变量是否生效
ffmpeg -version

# 开始使用
ffmpeg -rtsp_transport tcp -i "rtsp://账户:密码@IP:554/h265/ch1/main/av_stream" -c copy -f flv rtmp://192.168.1.190:1935/myapp/stream1
报错指南
nasm/yasm not found or too old. Use --disable-x86asm for a crippled build.这是因为 FFMPEG 为了提高编译速度,使用了汇编指令,如 MMX 和 SSE 等。如果系统中没有 yasm 指令的话,就会该错误。
解决办法:安装 yasm。
wget http://www.tortall.net/projects/yasm/releases/yasm-1.3.0.tar.gz
tar zxvf yasm-1.3.0.tar.gz
cd yasm-1.3.0
./configure
make
make install播放指令:
ffplay rtsp://admin:hj123456@192.168.1.64:554/h264/ch1/main/av_stream成功后编写 shell 脚本启动接入多个摄像头,进入路径 /root/app/transmit_camera.sh
# 转发过磅车牌号摄像头

nohup ffmpeg -rtsp_transport tcp -i "rtsp://账户:密码@IP1:554/h265/ch1/main/av_stream" -c copy -f flv rtmp://192.168.1.190:1935/myapp/stream16 > r_camera_16.log 2>&1 &

nohup ffmpeg -rtsp_transport tcp -i "rtsp://账户:密码@IP2:554/h265/ch1/main/av_stream" -c copy -f flv rtmp://192.168.1.190:1935/myapp/stream17 > r_camera_17.log 2>&1 &
RTSP 流访问海康摄像头
| 参数 | 作用 |
|---|---|
| username | 用户名 |
| passwd | 密码 |
| ip | 摄像头 ip |
| port | 摄像头端口 |
| codec | 视频编码:h264、h265 |
| channel | 通道号:ch1、ch2 |
| subtype | 码流:主码流 [main]、子码流 [sub]、第三码流 、 |
| codec |
#rtsp://[username]:[passwd]@[ip]:[port]/[codec]/[channel]/[subtype]/av_stream
rtsp://username:passwd@0.0.0.0:554/h265/ch2/main/av_stream
以下是一个典型的 RTSP 数据 URL 格式:rtsp://username:password@camera_ip:port/h264/ch1/main/av_stream
其中,username 和 password 是摄像头的登录信息,camera_ip 是摄像头的 IP 地址,port 是 RTSP 服务的端口号(默认为 554),h264 表示视频编码格式,ch1 表示通道号,main 表示主码流类型。
例如,假设摄像头的 IP 地址为 192.168.1.64,用户名为 admin,密码为 a12345678,那么 RTSP 数据 URL 可以表示为:rtsp://admin:a12345678@192.168.1.64:554/h264/ch1/main/av_stream
VUE 播放 flv 格式视频流
http://192.168.2.69:8991/live?port=1935&app=myapp&stream=stream1
拼接规则
prot- 暴漏端口
app- 代理的地址
stream=使用的流
Vue 中使用 flv.js 视频播放器,并将其组件化
https://www.jianshu.com/p/894b77cf7433
优化:延迟卡顿优化
https://www.cnblogs.com/xiahj/p/flvExtend.html
定时脚本自动启动
vim /root/app/check_ffmpeg.sh运行过程中防止程序异常停止或者服务器重启,写一个脚本自动启动。运行几天发现晚上时程序不会停止但推流卡住了,监听 CPU 占用率 10 次如果都为 0,杀死进程重启一下程序,脚本如下:
#! /bin/bash
. /etc/profile
. ~/.bash_profile

# 定义函数,传入一个PID作为参数
function check_and_kill_pid {
    echo "call function...$1" >> /root/app/task.txt
    local pid=$1
    local threshold=10  # 连续为零的次数阈值
    local count=0       # 计数器

    # 检查是否传入了PID参数
    if [ -z "$pid" ]; then
        echo "没有传入PID参数" >> /root/app/task.txt
        return 1
    fi

    echo "开始监控 PID $pid 的CPU占用..." >> /root/app/task.txt

    # 循环检查10次
    for (( i=1; i<=10; i++ ))
    do
        # 获取PID的CPU占用情况
        cpu_usage=$(top -b -n 1 -p $pid | tail -n +8 | awk '{print $9}')
        cpu_usage=${cpu_usage%.*}  # 取整数部分

        # 判断CPU占用是否为零
        if [ "$cpu_usage" -eq 0 ]; then
            count=$((count + 1))
        else
            count=0
        fi

        # 如果连续达到阈值次数,则杀死进程
        if [ $count -ge $threshold ]; then
            echo "PID $pid 的CPU占用连续 $threshold 次为零,将被杀死" >> /root/app/task.txt
            kill $pid
            return 1
        fi

        sleep 1  # 每秒检查一次
    done

    echo "监控结束,PID $pid 的CPU占用未连续 $threshold 次为零" >> /root/app/task.txt
    return 0
}


PROC_NAME=ffmpeg
ProcNumber=`ps -ef |grep -w $PROC_NAME|grep -v grep|wc -l`
if [ $ProcNumber -le 0 ];then
   echo "testPro is not run" >> /root/app/task.txt
   nohup ffmpeg -rtsp_transport tcp -i "rtsp://账户:密码@IP1:554/h265/ch1/main/av_stream" -c copy -f flv rtmp://192.168.1.190:1935/myapp/stream16 > r_camera_16.log 2>&1 &
   nohup ffmpeg -rtsp_transport tcp -i "rtsp://账户:密码@IP1:554/h265/ch1/main/av_stream" -c copy -f flv rtmp://192.168.1.190:1935/myapp/stream17 > r_camera_17.log 2>&1 &
else
   # 检查 pgrep 命令是否可执行
   if ! command -v pgrep > /dev/null; then
     echo "Error: pgrep 命令不可用,请安装或确保具有执行权限。" >> /root/app/task.txt
     exit 1
   fi
   echo "testPro is  running.." >> /root/app/task.txt
   pid1=$(pgrep -f "ffmpeg -rtsp_transport tcp -i "rtsp://admin:123456@192.168.0.16:554/h265/ch1/main/av_stream" -c copy -f flv rtmp://192.168.1.190:1935/myapp/stream16")
   echo "找到的PID1是:$pid1" >> /root/app/task.txt
   check_and_kill_pid $pid1
   # 检查函数的返回值,根据返回值判断是否启动某些操作
   if [ $? -eq 1 ]; then
       echo "need启动pid1..." >> /root/app/task.txt
       nohup ffmpeg -rtsp_transport tcp -i "rtsp://账户:密码@IP1:554/h265/ch1/main/av_stream" -c copy -f flv rtmp://192.168.1.190:1935/myapp/stream16 > r_camera_16.log 2>&1 &
   else
       echo "pid1不操作,因为PID正常运行和CPU占用未连续为零" >> /root/app/task.txt
   fi
   pid2=$(pgrep -f "ffmpeg -rtsp_transport tcp -i "rtsp://admin:123456@192.168.0.17:554/h265/ch1/main/av_stream" -c copy -f flv rtmp://192.168.1.190:1935/myapp/stream17")
   echo "找到的PID2是:$pid2" >> /root/app/task.txt
   check_and_kill_pid $pid2
   if [ $? -eq 1 ]; then
       echo "need启动pid2..." >> /root/app/task.txt
       nohup ffmpeg -rtsp_transport tcp -i "rtsp://账户:密码@IP1:554/h265/ch1/main/av_stream" -c copy -f flv rtmp://192.168.1.190:1935/myapp/stream17 > r_camera_17.log 2>&1 &
   else
       echo "pid2不操作,因为PID正常运行和CPU占用未连续为零" >> /root/app/task.txt
   fi
fi
注意变量名 pid1、pid2 后等号两边不能有空格
保存脚本
:wq- 打开终端,输入以下命令来编辑 crontab 文件:
crontab -e- 在编辑器中添加定时任务,格式如下:
* * * * * command
# 我这里用
*/2 * * * * ./etc/profile;sh /root/app/check_ffmpeg.sh >/dev/null 2>&1
其中,五个星号分别代表分钟、小时、日、月、周,可以使用以下符号:
*:代表任意值,:代表多个值-:代表一个范围/:代表间隔时间
- 保存并退出编辑器。
注意事项:
- crontab 文件中每行只能有一个命令。
- crontab 文件中可以使用
#开头的注释。 - crontab 文件中的命令执行时的环境变量可能与用户登录时的环境变量不同,需要注意。
- crontab 文件中的命令执行时的工作目录可能与用户登录时的工作目录不同,需要注意。
- crontab 中的路径应该是绝对路径,而不是相对路径。
- crontab 不会自动处理环境变量,所以如果你的脚本依赖于某些环境变量,你需要在脚本中明确设置这些变量。
- crontab 默认使用邮件系统发送任务的输出结果,如果你没有设置邮件系统,可能会看到一些错误信息,你可以通过在脚本中添加重定向操作符(如 "> /dev/null")来忽略这些输出。
查看 crontab 状态,你可以通过以下命令查看 crontab 的状态,如果一切正常,你应该能看到你刚刚添加的任务。
crontab -l修改 crontab,如果你需要修改 crontab,只需再次运行 crontab e 命令,然后编辑你的任务。
删除 crontab 任务,如果你需要删除一个任务,你可以在编辑 crontab 文件时,将该任务的那一行删除,然后保存并退出。
#海康
参考文章
用这个文章试了试 win 好用:有一个 win 启动的脚本
Windows上使用FFmpeg实现本地视频推送模拟海康协议rtsp视频流
# Nginx搭建RTMP服务器+FFmpeg实现海康威视摄像头预览
看似有用,说解决 h265
# Nginx+FFmpeg 海康、大华NVR实现rtsp转flv实时预览+录像回放
文章提到使用 VLC 查看引流测试
# Windows上搭建Nginx RTMP服务器并使用FFmpeg实现本地视频推流
让我成功下载 nginx-http-flv-module ,其余的都不好用
# nginx+nginx-http-flv-module在Linux服务器搭建
让我知道 Nginx 成功启动 nginx-http-flv-module 插件
【入门】ffmpeg、nginx、nginx-http-flv-module转发rtsp流、VLC查看
解决海康摄像头 RTSP 流访问地址含义以及如何拼接
# RTSP流访问海康摄像头
将本地电脑摄像头推流到 Nginx
# 利用ffmpeg实现rtmp推流